Friday, June 19, 2015

Garden Robot Update 5

Success!!
This took way longer than it should (and is a much more major victory to me than it should be) but I finally got a web page to host the current numerical sensor value of a light sensor running on my NXT.  This took several days due to some stupid problems:

1.  The NXT Direct Commands documentation explains that the getInputValues command sends a return byte package of 16 bytes, but I forgot that since I am using Bluetooth, another 2 bytes are tacked on the beginning.  That caused my interpretation to be offset by 2 bytes for the longest time.  Oops.
2.  This one was even worse, but I blame it on not knowing anything about Java.  So I didn't understand how the InputStream works, and I didn't at first realize that the return values from previous direct commands were already stored in the buffer, causing me to read the wrong value.  Secondly, I didn't realize that the InputStream is reset each time I called the command (still not sure why...) So as of now, I am having it skip over the 5 bytes returned from the setInputMode command before reading the 18 byte package from the getInputValues command.

Here's what I've got...
long skipped = stream.skip(streamskip);
int bytesRead = stream.read(data,0,18);
Log.w("NxtBrick", "Bytes Read: " + Integer.toString(bytesRead));
String x = Integer.toString(((data[12] & 0xff) << 8) | (data[13] & 0xff));

Log.w("NxtBrick", "Sensor Value: " + x);
return x;

And to write to NanoHTTPD:
NxtBrick nxt = ServerActivity.getNxt();
String answer="";    try {
        //nxt.playTone('a','c');        nxt.setInputMode((byte)0x00,(byte)0x06,(byte)0x80);        answer=nxt.getInputValues((byte)0x00);    } catch (IOException e) {
        e.printStackTrace();    }
return new NanoHTTPD.Response(answer);


Sunday, June 14, 2015

Garden Robot Update 4

This happened today:


Still not sure how it works, but it's being hosted by my phone, which is cool.  I somehow ran across it randomly when wondering why none of the NanoHTTPD examples I found worked (doubtlessly because of my utter lack of Java knowledge...ugh).  But it works.

Next step is reading sensors from the NXT, where I am currently stuck.  I have delved deep into the NXT SDK where they have documentation on some really cool direct command protocols, which do not require a user-developed program running on the brick (excellent for direct remote control if the program is doing something wrong).  Unfortunately, while I am having no issue using the direct commands developed by the SmartLab NXTBotGuard project, I seem to be getting some bogus data when I call the getInputValues.  It changes whenever I reboot the program but not in the middle of it...it is weird.  I am sure it is a dumb Java issue.  For reference purposes, here's my buggy code:

public String getInputValues () throws IOException
{
    byte [] msg = new byte [5];            msg[0]=(byte)0x04;            msg[1]=(byte)0x02;            msg[2]=(byte)0x00;            msg[3]=(byte)0x07;            msg[4]=(byte)0x00;    sendMessage(msg);    Log.w("NxtBrick", String.valueOf(msg));
    if(in !=null)
    {

        String x= String.valueOf(in);        Log.w("NxtBrick", x);
       /*        String x = null;        int bytesRead;        byte[] contents = new byte[100];        while ((bytesRead = in.read(contents)) != -1)        {            x = new String(contents, 0, bytesRead);            System.out.print(x);            Log.v("NxtBrick", x);        }        */
        return x;    }
    else    {
        return "Null";    }

}

P.S.  Don't use it, it doesn't work.

Tuesday, June 9, 2015

Garden Robot Update 3

It's been a little while, but unfortunately not much has progressed.
I have contacted the developers of the MonoBrick Tunnel and haven't heard anything back yet.  This has encouraged me to go with route 2 and try to develop a custom app to handle connectivity and web serving.  It has been an interesting couple of days...

First of all, I have no clue what I am doing, so I first tried to get the NXTBotGuard project I linked earlier to work.  After downloading Android Studio, I found that I could import the Eclipse project and convert it into an Android Studio project, which is awesome.  However, running it, I ran into a lot of issues.  Firstly, the NXT brick refused to connect reliably, with the app crashing at random intervals.  Even when the Bluetooth connection succeeded and I was able to access the hosted web page, entering in the password caused the app to crash.  Reading the Logcat files, I determined that something concerning the phone's camera stream was causing it to crash, but due to my limited Java knowledge, I (still) have no clue what.

With this frustration I decided to bit the bullet and just start personal development of a custom app.  Using copious amounts of copy/paste from NXTBotGuard and a plethora of external websites, I managed to form a simple app that enabled Bluetooth, listed paired devices, scanned for devices, and displayed them in a list view for user input.  So far, it is able to connect to the NXT quite reliably, and does not crash like the NXTBotGuard app.

However, the next step is where I am (still) stuck.  NXTBotGuard makes use of a lightweight HTPP server known as NanoHTTP.  Again, I have no idea how it works, so that is my next project.

First to figure out Java's multi-threading architecture...I am so lost...

Wednesday, June 3, 2015

Garden Robot Update 2

Okay...don't be me.
So on the software side, using the MonoBrick C# Communication Library, I managed to set up a simple Windows Form interface that allowed for manual polling of the moisture and light sensor over the MonoBrick Tunnel running on an Android device.  But then I wanted to set up video streaming...

I couldn't get it to work.  I even tried downloading MonoBrick remote (which worked on a different computer and back when I was running Android 4.4.4) and it still wouldn't stream.  I speculate that upgrading to 5.0.2 has caused a lot of issues, including the "menu crashing" error.  Everything worked except for the streaming (and the fact I still couldn't access the menu).

So I tried re-installing the app.  This was the big mistake.  This removed the NXT from the "remembered device" list previously only accessible through the menu.  And now, since I can't get to the menu, there is no way I can reconnect the NXT.  Oops.

So while I wait for a response from the MonoBrick folks, I decided to screw around with other alternatives.  At this point, the second option from my previous post is looking pretty good...but there's still the Java problem.

Wednesday, May 27, 2015

Garden Robot Update 1

Okay...first update.
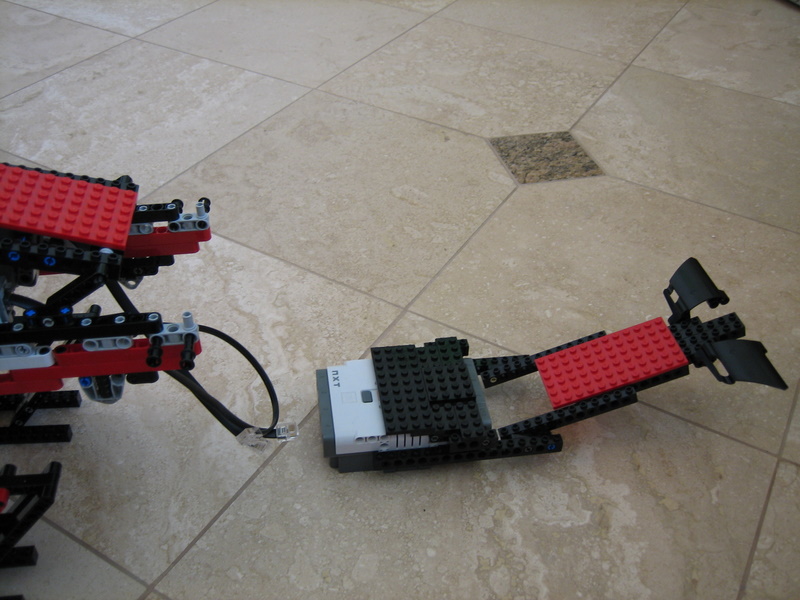
Couple mechanical pictures:

I spent quite a long time looking for a valve we had sitting around, and Mom found one in about 5 seconds.  In its former glory, this faded yellow device connected to a hose water spigot, allowing for the fill of water balloons as regulated by the yellow lever on the close side.  I used a 5:1 gear reduction and a single NXT motor to operate the valve (Yes, this is the first time ever I have glued a personal LEGO.) You can't see it in the picture, but the black hose is from a drip irrigation system I got years ago, and is currently connected to a crudely-cut water bottle and sealed with my mediocre hot-gluing skills.  The water bottle acts as the water reservoir and feeds via gravity through the valve.  By opening the valve for different amounts of time, I can adjust how much water is fed to the plant.

 Here is my current test setup.  Three containers of dirt (thankfully "science experiments" are encouraged in my house) and two nails for use as probes.  They are used in a basic "touch sensor" setup, in series with a 2.2kOhm resistor and connected to pins 1 and 2/3 of a sensor port.  More conductivity means more water present, and a lower raw  sensor value read by the NXT.


After a long, multi-day drama (see below), I'm currently at this code:

//Macros for moisture thresholds (raw probe values)
#define HIGH 500
#define MED 300

//Macros for watering times (ms)
#define HIGHWAIT 2000
#define MEDWAIT 1000

//Macros for moisture test wait time (ms)
#define TESTWAIT 5000

int MoistureLevel;

sub MoistureTest()
    {
int raw;
//Apparently the following 2 lines are necessary with updated firmware.
     SetSensorType(S1, SENSOR_TYPE_CUSTOM); //Set the sensor type.
     ResetSensor(S1); //Necessary following SetSensorType
     int data[10]; //Create a data vector with 10 elements
     for(int i=0; i<11 10="" epeat="" i="" p="" times="">             {
             raw=SensorRaw(S1); //Set "raw" variable equal to probe reading
             data[i]=raw; //Use the loop counter as index to save raw in vector
             ClearScreen(); //Don't forget this
             TextOut(0,LCD_LINE1,"Current value = ");
             NumOut(0,LCD_LINE2,raw); //Display current value
             Wait(100); //Wait 1/10 a second
             }
     MoistureLevel=ArrayMean(data,NA,NA); //Reduce noise by averaging vector
     }

sub Water(int WaterLevel)
    {
    if (WaterLevel==0) //Do nothing for an argument 0
       {
       }
    else //Open valve, wait the time given by the argument (>0) and close valve
        {
        RotateMotorEx(OUT_A,100,-470,NA,false,true);
        Wait(WaterLevel);
        RotateMotorEx(OUT_A,100,470,NA,false,true);
        }
    }


task main()
{
     while (true)
{
Wait(TESTWAIT); //Wait for a while before testing moisture level
           MoistureTest();
           PlayTone(262,400); //Play Tone to assert completion of subroutine
           ClearScreen();
           TextOut(0,LCD_LINE1,"Mean value = ");
           NumOut(0,LCD_LINE2,MoistureLevel); //Display this average value
           //This structure displays LOW, MEDIUM or HIGH on screen
           //and passes a watering time argument to the Water subroutine
           if (MoistureLevel <=MED)
       {
       TextOut(0,LCD_LINE3,"LOW");
       Water(0);
       }
           else
          {
               if (MoistureLevel >MED && MoistureLevel<=HIGH)
                  {
                  TextOut (0,LCD_LINE3,"MEDIUM");
                  Water(MEDWAIT);
                  }
               else
                   {
                   TextOut (0,LCD_LINE3,"HIGH");
                   Water(HIGHWAIT);
                   }
               }
           }
}


The NXC Drama:

  1. My first thought:" I should have upgraded to the enhanced NXC/NBC firmware ages ago.  It has support for up to 4D matrices, which is awesome." Unfortunately, it's not that easy.  
  2. Setting up BricxCC was a pain.  I didn't have the MINDSTORMS software already installed on my computer, so I needed the Fantom Drivers from this LEGO page (which they actually still host, much to my shock).
  3. But I got a weird .ini file error when running the autorun.  I found someone else with the same issue, and instead used the drivers from this page (as linked by the second post in the thread).
  4. With the drivers installed, BricxCC was able to connect to my NXT (I had some stock firmware already on it).  For a while I was stuck because an array command I was trying to use wasn't recognized.  I later figured out it was because the compiler will recognize the firmware you are using in your NXT and throw an error if you use commands intended for the enhanced firmware.  So I was off to find the enhanced firmware...
  5. I first tried to flash the firmware linked on this page onto the NXT using BricxCC's Firmware Download feature.  It worked perfectly, but when I ran my program, I kept on getting a "0" raw value back from the sensor, which couldn't be right.  I assumed it was a firmware issue, so I looked elsewhere for a different firmware.
  6. I made the mistake of getting a firmware binary from this page and attempting to use BricxCC's Firmware Download feature to flash it to my NXT...oops.  I had no idea what I was doing, and it totally failed, bringing my brick to "quiet clicking" model.  If I had read more closely, I would have been able to tell that I needed to compile it first, which I didn't.
  7. I then tried to revert back to my earlier firmware using the same feature...it didn't work at all, but BricxCC didn't throw an error.  I was perplexed, because my NXT was reduced to quiet clicking, and even though I downloaded the stock LEGO firmware, it wouldn't respond.
  8. Getting a bit worried, I booted up my old computer and started up NXT-G 1.1  Thankfully, I was able to flash the stock firmware onto my quiet clicking NXT.  After repeating the whole "firmware binary" episode a second time, I read the page and realized my mistake.
  9. This made me realize that my first firmware flash must have been correct, and the problem was in my code.  After some searching through the documentation, I eventually stumbled upon the weird reality that you must first use SetSensorType to define the sensor, and then use ResetSensor, and you can then use SensorRaw to read it as before.
  10. After some more screwing around with the firmware versions (the flash contained two different versions of the enhanced firmware, and only one worked), I settled upon using the "lms_arm_nbcnxc_132.rfw" version.
TL;DR:  Use this Fantom Driver and the "lms_arm_nbcnxc_132.rfw" file from the enhanced firmware linked on this page.  Don't use BricxCC's Firmware Download feature when restoring a clicking NXT, use NXT-G's instead.

Garden Robot

Hello World, it's been a while.
Unfortunately, real life has gotten in the way of my MINDSTORMS pursuits.  That being said, in honor of the fact that it is summer, I have decided to take a far more structured approach to a much larger project.  I won't get into it in depth here, but I essentially want to make a garden robot.  That is a bit broad.  To narrow it down, I have some specifications:

  1. Use LEGO MINDSTORMS NXT for actuation.
  2. Completely autonomous/maintenance-free for extended periods.
  3. Water plants (only, for now).
  4. Relay critical information over the internet (moisture content, PH levels, ambient light, etc.).
  5. Be completely controllable over the internet (all functions accessible).
Numbers 4 and 5, particularly considering specification 1, are apparently quite complicated.  The NXT, unlike the EV3, has no embedded WiFi capability.  Thankfully, with a bit of digging, I was able to chance upon two different projects:

The folks at MonoBrick have created a set of tools to allow for enhanced communication with the NXT and EV3.  Notably, they have developed a "tunnel" Android application that allows you to connect the phone via bluetooth to the NXT and via the internet to a client.  Using their handy C# communication library, you can develop programs to send direct commands to the NXT.  Another huge plus is the capability to stream live video from the phone's camera.  For the time being, this is my method of choice, but there are a couple drawbacks:
  1. Whatever you have running the program on (which for now is my laptop) has to be working...at all times.  Considering I'm a student, this is impractical.  Therefore, whatever code I write on this has to be in addition to the autonomous code that is running on the robot.  This isn't a bad thing, but it will require a bit of creativity to get the two different languages to work with each other seamlessly.
  2. The tunnel app, after upgrading my phone to Android 5.0.2, seems to have lost its menu.  This is an issue if I want to adjust anything, such as which NXT the bluetooth connection pairs with.
  3. I don't really understand this part, but I think that if I switch WiFi networks, I have to reconfigure the client listening port.  Not a big issue, but certainly a limitation due to my restricted programming knowledge.
Secondly, I found another project by SmartLab that does something similar - you place an Android phone on the robot, and it connects via Bluetooth to the robot and via WiFi to the internet.  But this one has a very different type of flexibility - the phone runs its own HTTP server, allowing you to access and control the machine via a webpage.  This is exciting because it removes the need to use a local program to access the robot over the internet.  But for now, this is not my method of choice for two simple reasons:
  1. It's written in Java.  I don't know Java.  At all.
  2. The program they used as an example works by sending direct commands to the NXT.  Considering I have specified that the robot to be autonomous, I will need to figure out how I can write it as a predetermined program on the phone.  I'm sure it's possible, but we are entering the realm of app development here, and I don't know anyone who develops Android apps who might be able to help me with this.
So, for the time being, while I am working out prototypes and proof-of concepts, I have decided to do as follows:
  1. Write a NXC program (this I've dabbled in before) that runs on the NXT to control autonomous function.
  2. Experiment with the MonoBrick library in VisualStudio to work out a communication method between the Windows Form application I'm planning to write (for the GUI) and the robot's data logs.
  3. See if I can work out streaming video (it works in MonoBrick's remote program...I should be able to get it to work on mine too!  Right?)
  4. For all of this, use haphazardly-designed prototypes (Okay, maybe not completely) to make sure I can actually build this thing mechanically.

Friday, June 14, 2013

XenonFire - A Tribute

Inspiration.
The world is run by this simple concept.  Inspiration always precedes innovation.  Would the modern automobile as we know it exist if Henry Ford had to re-invent the wheel?  What about the computer or modern medical science?  Isaac Newton put it best when he famously uttered:  “If I have seen further it is by standing on the shoulders of giants.”
When I first joined the NXTLog community, it was because of inspiration.  Seeing all of the incredible projects filled my mind with possibilities of what I could do.  Not just to admire and wish I had the pieces or the skills, but to use the ideas themselves as sources for my own constructions.
Therefore, inspiration was a major part of my robotics career even before I joined FIRST.  It is For Inspiration and Recognition of Science and Technology – the ultimate goal of the program is to inspire participants, mentors, and others about engineering technology.  And today, I bring you a tribute…to teamwork, coopertition and inspiration in general.
Those of you who have been around for a while might recognize these two creatures…in August 2010, NXTLog released the Robotic Pet building challenge.  Dogs, cats and birds headed the popularity list when scanning the list of entries…but most eyes paused in surprise when gazing at the two projects you see above.  CheshireCat150 and NatoNX had a slightly different take on the challenge.
So what’s so significant about two competing entries into the same challenge?  What’s the point?  And what does this have to do with the “inspiration” I was talking about earlier?  Well, in life and in FIRST, it is impossible to improve unless you are willing to learn from your competition.  Who knows, your competition might even be on your alliance someday…
Xenon (CC150’s entry, top) and BlazingFire (my entry, bottom) were two very different entries into the same challenge.  Both came at the True Problem of building a dragon in a different way, and the different Specifications each builder generated is evident in the Detailed Design exemplified in each one.  Xenon breathed fire and walked reliably, while BlazingFire raised his arm in anticipation of getting a treat.  What would I get, I wondered, if I tried to combine the two into one, and left the result as a tribute to inspiration and teamwork…?
This is XenonFire.  A week-long project attempting to combine the best of both Xenon and BlazingFire into a single design that, while not superior to either design alone, is a symbol of inspiration across the realm of robotics and life in general. 

LEGS/WALKING MECHANISM
The legs and walking mechanism are core to any quadruped dragon, and an essential part of the three you see here.  They put the LEGO in Motion, allow them Rumble over anything in their way, and Ultimately, make the Ascent wherever they want to go.   BlazingFire, while possessing a meticulous leg design, lacked the reliable, quick walking speed featured by Xenon.  My goal was to integrate a similar leg design and CC150’s elliptical-based advancement mechanism into a single dragon.  Turning would be accomplished by a central pivot, and the legs would be mechanically linked as to stay in synchronization at all times without sensor feedback and software aid.  To do this, I used a double-differential setup featuring two motors that allowed full power of both motors to be applied to both the walking and steering mechanisms at different times.  Each of the motors are connected to one of the outputs of each differential, except that one motor’s output is reversed by means of a gear train before entering the second differential (the one on top of the robot.)  This way, the bottom differential turns when the motors rotate in the same direction.  This drives the center shaft that drives the legs.  The top differential rotates when the motors turn in the opposite direction.  This drives the center turntable that allows XenonFire to pivot and turn.


NECK AND HEAD
The neck and head are important features of any dragon, and provide key clues if the dragon is friendly…or just hungry!  XenonFire, while having a head too small to feature a fire-breathing mechanism that Xenon sported (trust me, I tried), does have a little red tongue.  Horns are similar to his predecessor BlazingFire.

WINGS AND TAIL
Another feature I certainly wanted XenonFire to have was wings, and I believe you will see a very strong resemblance..!  The tail, while not specifically based off of BlazingFire, is also rather similar. 

CONCLUSION
XenonFire features a simple navigation program, utilizing the ultrasonic sensor on his stomach.  This Code allows the Orange creature to roam autonomously.  When he detects an object for more than 0.5 seconds, XenonFire stops, opens his mouth and roars, then backs away, turns, and proceeds on his wandering. 
Enjoy these other pictures of XenonFire I had some fun taking earlier today…
 
XenonFire is a tribute to that inspiration, to the collaboration that allows our world to function.  Special thanks to CC150 - for all the inspiration.